


Newsletter
Sign up for our newsletter and get the latest designs, inspiration, maintainance tips, special promotions and much more. By signing up you agree to our privacy policy. You can unsubscribe at any time.
Fitting timber windows
Step 1 (DIY or Installer?)
You can contact your local “Building control” to guide you with your project. Building control will also need to inspect your new window installation once finished.
Alternatively, you can contact a Fensa registered installer.
Step 2 (Check your windows)
After delivery, it is a good idea to check all windows for possible damages and to make sure all measurements are correct.
Step 3 (Openings)
Place your new window into the wall opening to make sure it fits. Measurements should ideally allow for a 20mm tolerance taken from the smallest point of the opening(10mm on each side and top and bottom). Before you begin installing the new window, make sure that the wall opening is damp proof.
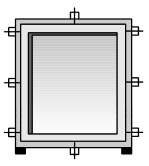
Step 4 (Spacing the window)
Before any fixings are used, place spacers in all four sides to level and plumb the window. Spacers should be used at 150mm from top and bottom of the frame and a maximum of 450mm between each spacer. Cill and head packings should be a maximum of 150mm from each jamb and underneath and on top of each vertical mullion.
The window must be placed a minimum of 30mm into the wall cavity and ideally 40-50mm.
Once all spacers are in place and the window is level and plumb. Open and close the window to make sure it opens and closes correctly.
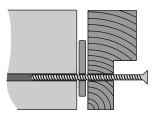
Step 5 (Fixing the window)
You can use screws, anchor plugs or fixing straps to fix your windows. We recommend using masonry / frame screws approximately 7,5x110-120mm.
Make two holes on either side of the frame using a 6mm wood drill. Remember to align the holes with the bricks and place your fixings at the same point as the spacer. Then change to a 6mm wall drill and drill into the brickwork.
The number of fixing points depends on the size of the window. Windows above 1500mm wide must also be packed and fixed in the center of head and cill.
Step 6 (Sealing the window)
Once fixed, chop off the packers/spacers with a shizzle and hammer flush with the window frame. To prevent air infiltration between frame and wall, the gap should be filled with an insulating material.
You are now ready to apply the finishing seal. We recommend using a polysulphide based sealant or expanding sealing strips.
Things you will need:
Apart from the tools used in the installation of your new windows, you will need the following:
- Packers/spacers in the right thickness
- Masonry/frame screws, fixing strips or anchor plugs
- Polysulphide sealant or sealing strips